This is part 3 of the tutorial series. In this part, we will create a A web application which can perform crud(create, read, update, delete) application to our database. We will not do much of coding. Netbeans will generate a lot of code for us..
1). Setting up the database. We are going to use a very simple database with just two tables.
The structure of our database will looks like this.

You can create it manually or you can import using this sql script.
Once the database is set, you need to go back to netbeans and under the services tab, expand MySQL server at localhost, and you will see a list of all the databases in your mysql.

locate the database with the name employee. Incase you dont see it, right click on MySQl server at localhost and select refresh.Once its available, right click on it and select connect. Netbeans will create a connection to that database as shown here.
2.Creating a web application with crud operations.
Inside netbeans, go to File>New project under category select Maven>Web Application give it the name of your choice. Leave all the other details default.


Right click on the new project, go to properties.
Go to frameworks. Click add, select Java Server Faces

In the Java Server Faces configuration, in the component tab,select primefaces and click ok.

Clean build the project. Maven will download all the required libraries for you. Just sit back and relax. When the building process completes, run your project. it should open on your browser and show something like this.

The next part is to link our project to our database. Right click on the project you have created, go to new>Entity Classes From Database. On the Data Source option, click on the drop down menu,scroll and pick the last option in the menu which is new data source.

On the JNDI Name call it jdbc/employee and in the Database Connection option, select the new connection the was added by netbeans during step *****. All the table in that database will appear in the left panel.

At the center of the two panels, click on add all and click next.All tables will be shown now on the right panel.

Click next.

Enter 'entities' as the package name.Leave everything default and click finish.
Right on the project again and select JSF From Entity Classes.

In the next window, click add all, click next, enter facades as the session bean package name and controllers as the JSF Classes package.On the choose templates, click on the drop down and select primefaces.

Click on finish, clean build and run the project again. If all goes well, you should see something like this.


There are two solutions for this but I will discuss the easiest one.
Go to other sources in your project as per the image below.

The glassfish-resources.xml in the setup folder. Select all the content inside the <resources> content to be copied.</resources>
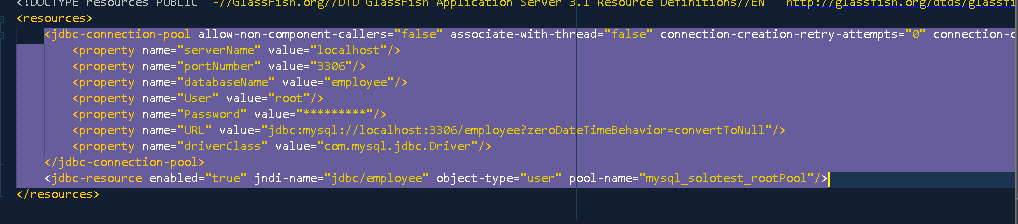
Open the domain.xml file located here glassfishhome/domains/domain1/config/domain.xml
Mine looks like this.

Search for the <resources> opening tag.press enter immediately after the <resources> tag.

Paste the content there.

Save the file and restart your glassfish(go to the services tab>Servers right click on the glassfissh and click restart). Your app should now run without error.
Click on Show All Employee Items.Now you can add, edit view and delete data from our database.
We will do some customization.
Inside the entities package, open employee.java and add the following code
public String getCategory()
{
return this.categoryId.getCategoryName();
}
This method will give the string representation of the employee category name.
in the web pages folder, open List.xhtml which is inside the employee sub-folder, Locate where you have this line of code <h:outputText value="#{item.categoryId.id}"/> and change it to <h:outputText value="#{item.category}"/>. run the application again and when you go to all employess, you will notice that the department name is now the actual name not the integer id.
In the same List.xhtml, add the following lines inside the <p:dataTable> tag.
rowIndexVar="rowIndex"
paginatorPosition="bottom"
the final tag should look like this.

delete the first dataTable column that displays item,id and replace it with
<p:column style="width:5%">
<f:facet name="header">
<h:outputText value="No."/>
</f:facet>
<h:outputText value="#{rowIndex+1}"/>
</p:column>
Check image above for hint.
Run the app again. you will notice that the table now has a counter for all item without exposing the id of the employee item as stored in the database.
When you click on create employee button, you will see something like this

while we expect something like this.

To fix that, locate where you have this lines of code
var="categoryIdItem" itemLabel="#{categoryIdItem}"
and change it to var="categoryIdItem" itemLabel="#{categoryIdItem.categoryName}"
do the same for the edit.xhtml. test the app again.
I now assume that you know what to do with the view.xhtml.
In the next post, we will design our report and update our list>xhtml so that we can have a button to trigger the report creation. Please Let me know if there are any problems you are facing. Thanks.
No comments:
Post a Comment